|
October 28th, 2010
In Focus Review - Warlord 2nd Edition: Savage North from Reaper 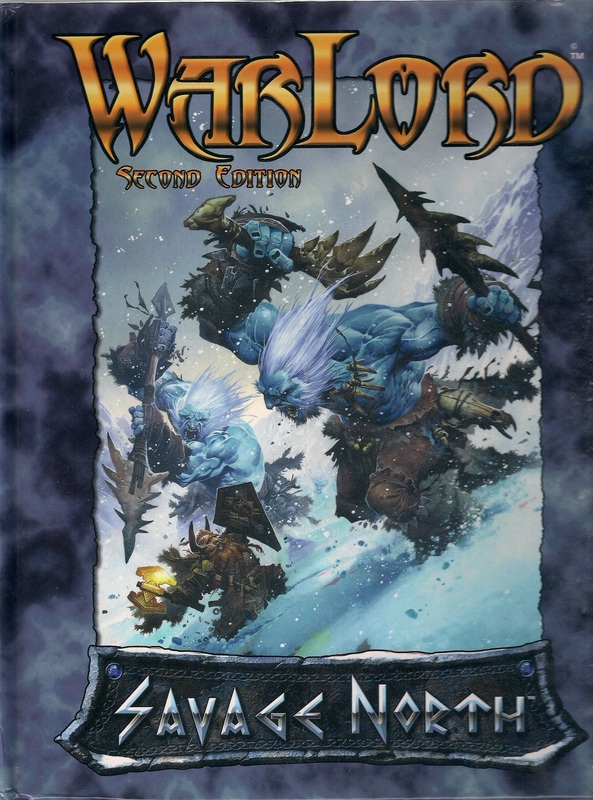 Reaper is primarily known for being a manufacturer of quality all metal miniature models. They've also created a few games over the years, all of which use the RAGE (Reaper Adventure Gaming Engine) engine like CAV and Warlord. Warlord has been one of their most popular games, and at Gen Con this year they debuted Warlord 2nd Edition: Savage North.
Savage North is a complete stand alone game, which is based on the Warlord 2nd Edition rules, but it's an expansion for Warlord 2nd Edition as well. So if you're familiar with Warlord and the RAGE engine, then Savage North should be quite easy to pick up and run with. Warlord 2nd Edition: Savage North comes as a full size168 page hardcover rulebook. Pages 8-37 make up the rules section of the book, covering all of the basics. To play Savage North, aside from the rulebook you'll need some D10 (ten sided) dice, a ruler/measuring tape in inches, some beads/counters, a standard deck of 52 playing cards, and of course some Warlord miniatures and their Data Cards.   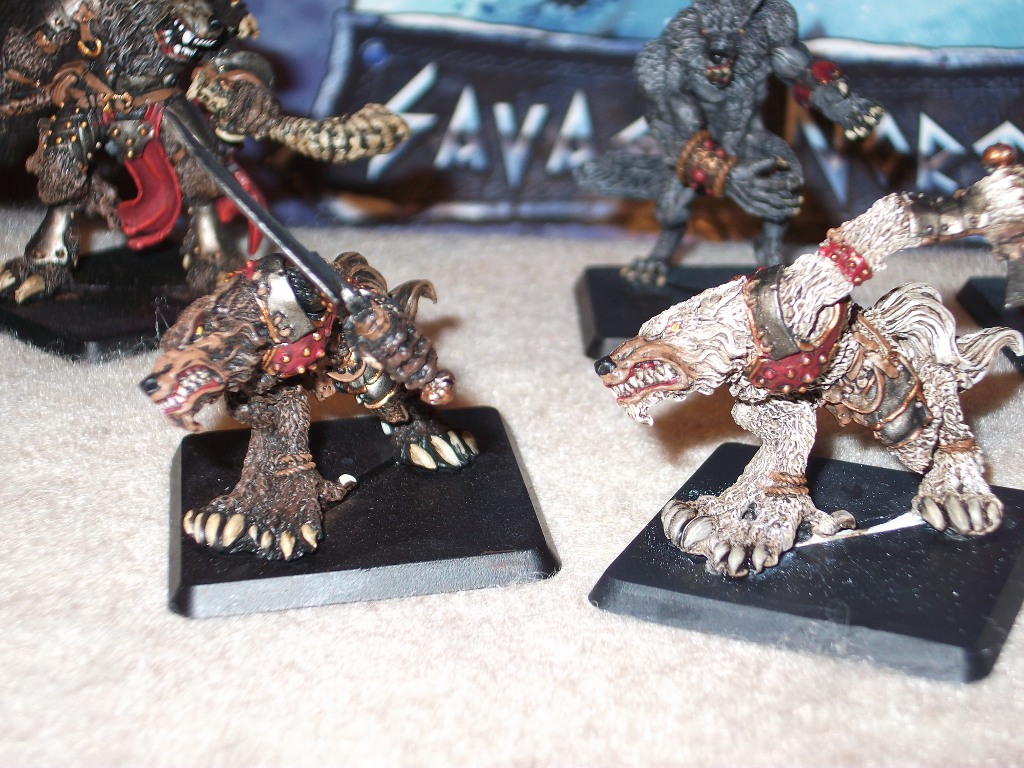 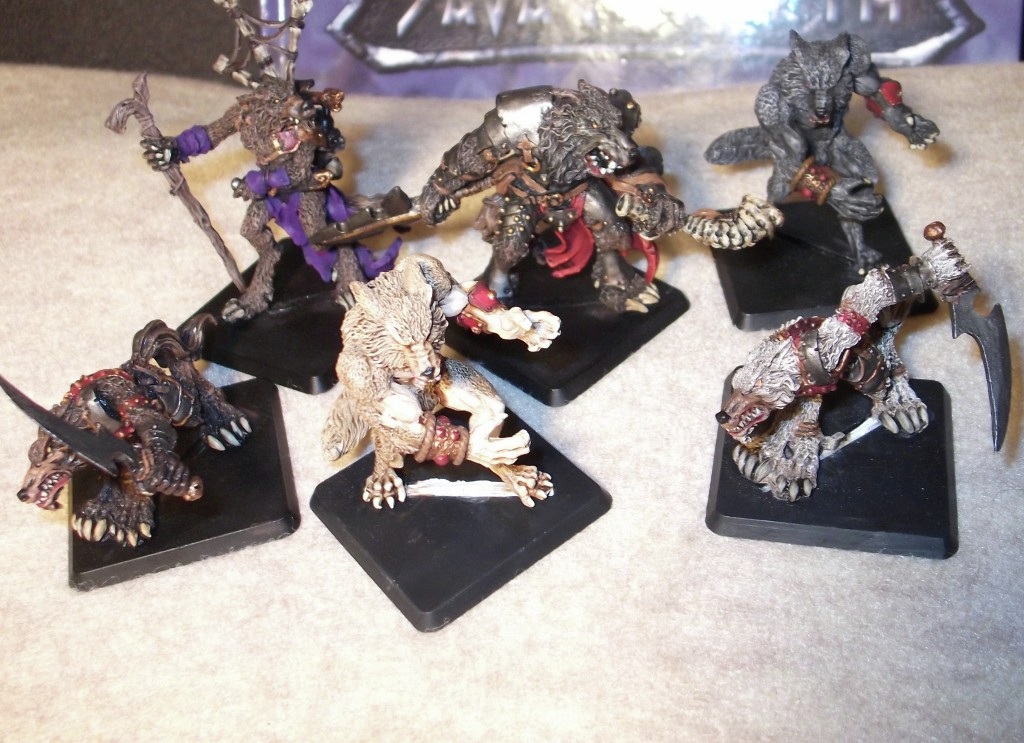 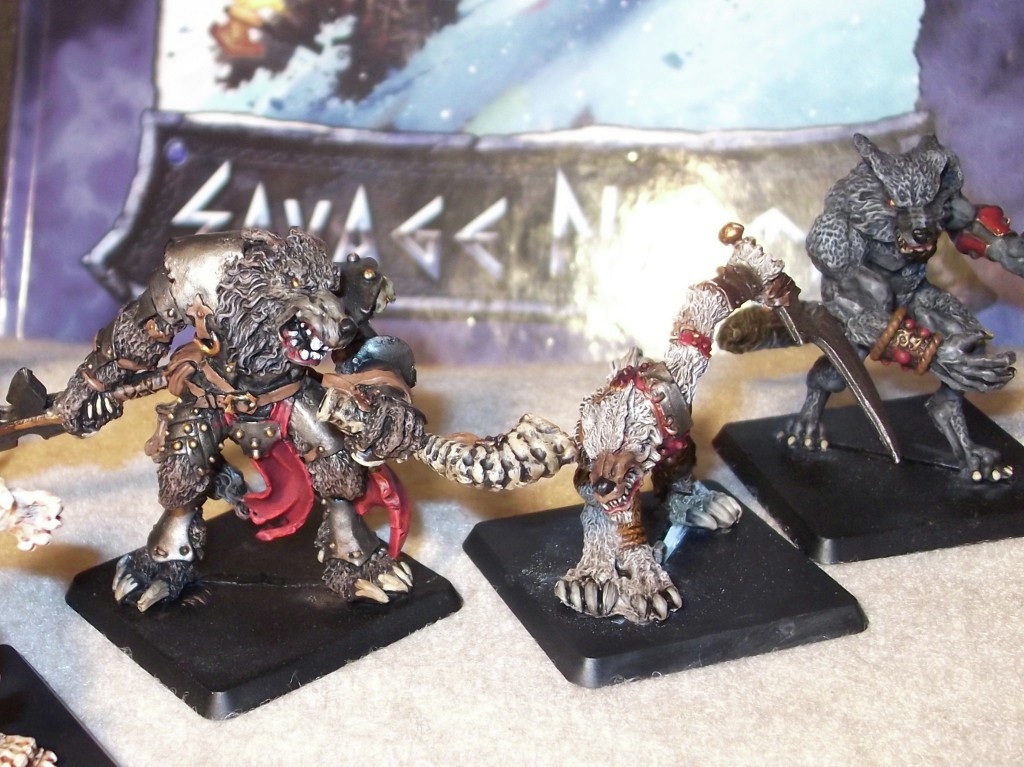 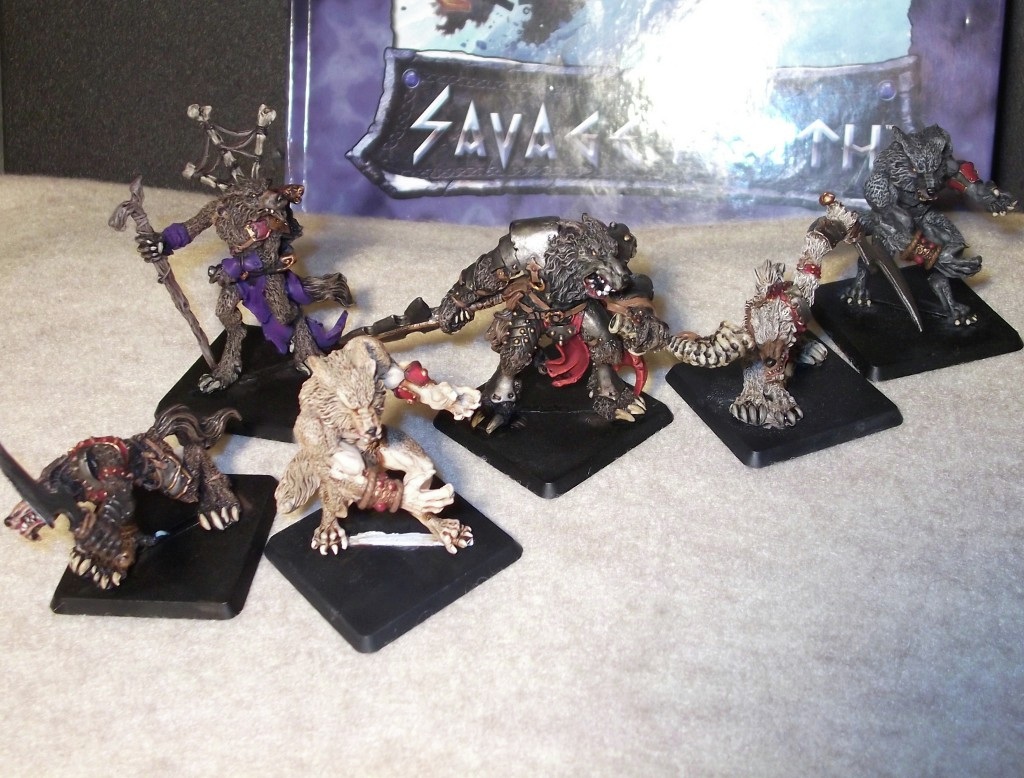 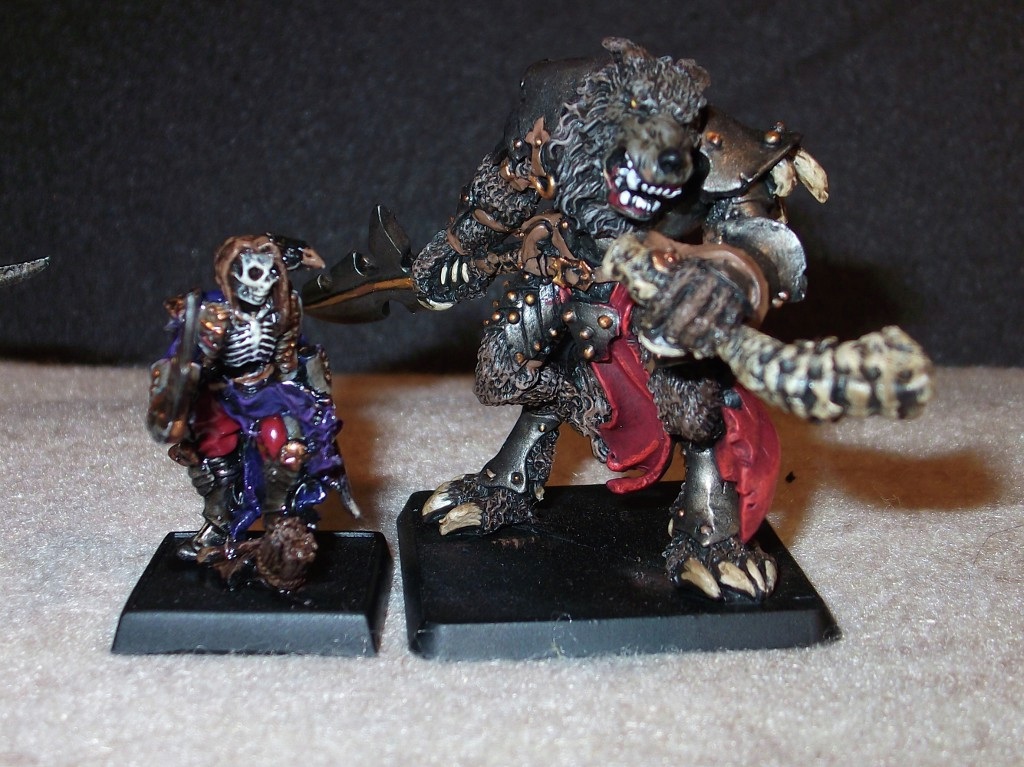 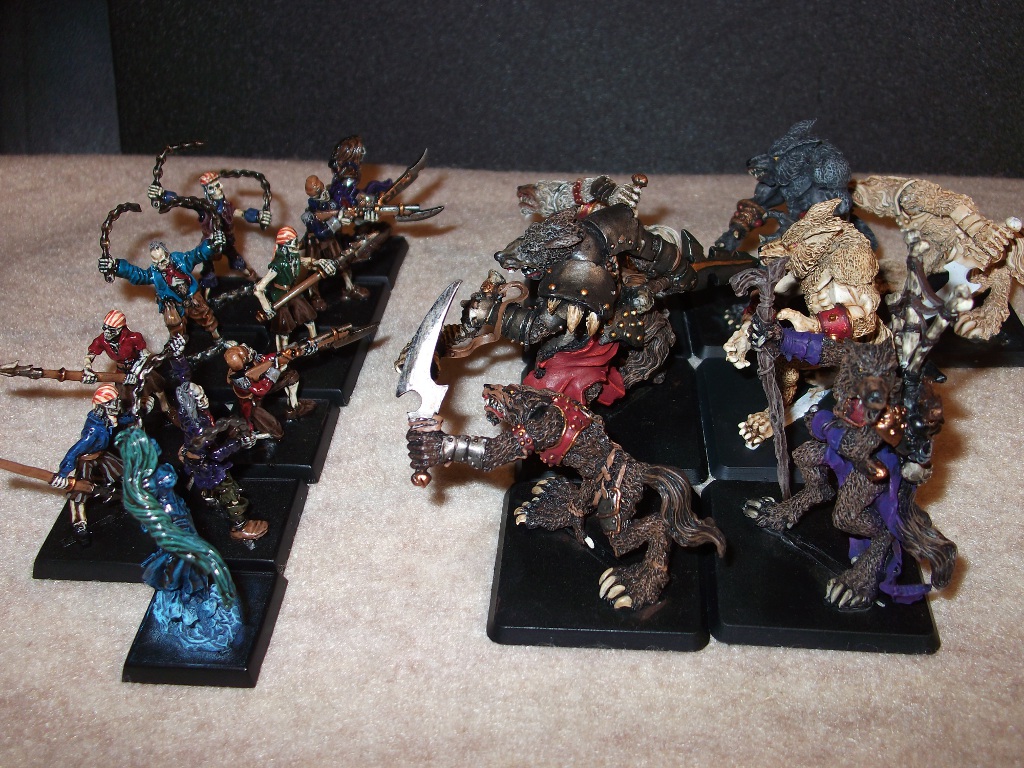 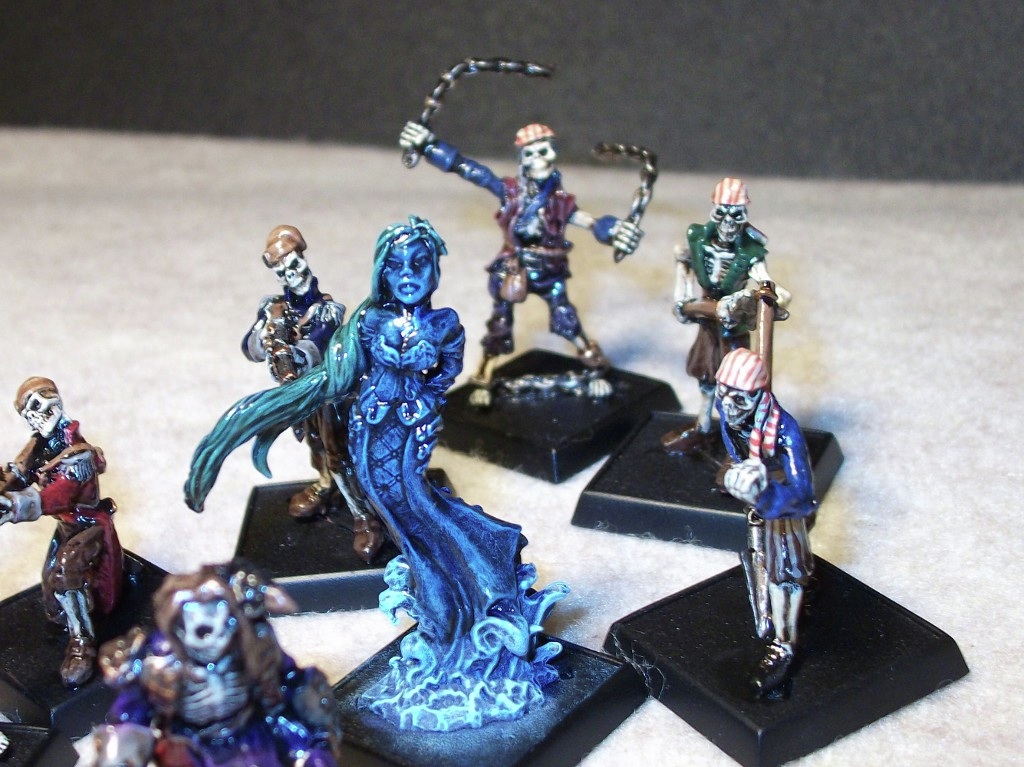 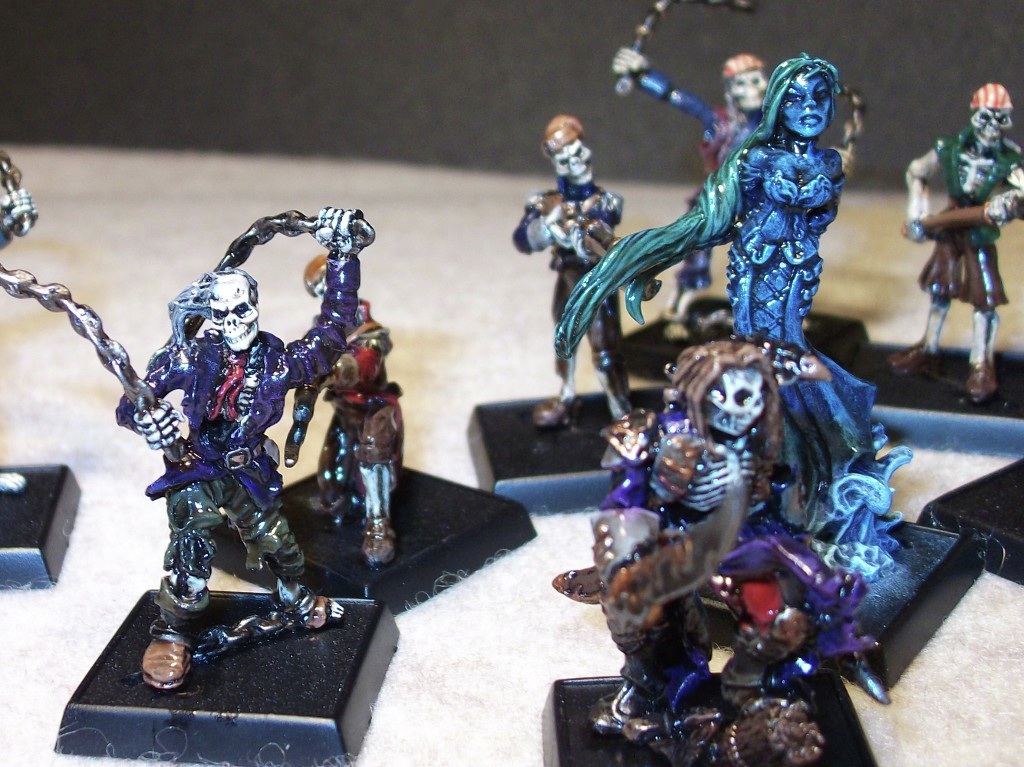 Playing Warlord is quite simple. There's three phases in a single game round. There's the Initiative Phase, Action Phase and End Phase. To begin one player will place terrain, while the other player picks their deployment side, and who does what is determined by a simple roll-off.
Next you'll need to create a Draw Deck from a standard deck of 52 playing cards. This is achieved by assigning each player a suit, and then taking a number of cards equal to how many Troops they have in their army based on their suit, and then placing them into the Draw Deck. So if one player has 10 troops and he has been assigned Hearts, he then places 10 cards with hearts on them into the Draw Deck. The other player may be assigned Spades, so he places 9 cards with Spades on them into the deck, since he has 9 troops in his army. The Draw Deck is now shuffled, and the top card turned over. Now who ever has that suit deploys a single troop. Then the next card is revealed, and who ever has that suit deploys, and this is repeated until all troops have been deployed. Next there can be a Pre-Battle Phase, and the order of which troops activate is handled in the same manner. The deck is again shuffled, the top card revealed, and that player may conduct any Pre-Battle Phase actions, and if the other side has the means to do so, then the next card is revealed and if it's their suit they can do the same until both sides have exhausted all Pre-Battle Phase actions. If there are none, you skip Pre-Battle and go right to the Initiative Phase. Now the actual game can begin, but not until the Draw Deck has been shuffled again, and this is called the Initiative Phase. Once the deck is ready to go and the top card revealed, it's now the Action Phase. Who ever has the suit revealed may activate a single troop, after they're done the next card is revealed, and who ever has that suit may activate a troop, and this goes on until both sides have activated all of their troop/models. A simple bead next to the model (or data card) is the best way to show a model has activated too. The total randomness to this mechanic can be brutal sometimes, as a player can activate many models before the other player has a chance to activate a single one, and vice versa, because it's all about what order the cards are drawn. There's special abilities as well that can grant an extra card for a turn too, so you can somewhat “stack the deck” a little, but that's about the only influence you can have on the Draw Deck. Once the Action Phase is over players begin the End Phase of the turn. In this phase the Draw Deck is adjusted. Cards are now removed for models eliminated during the Action Phase, and any cards granted by special abilities are also removed. This is effectively the maintenance phase, which ties up any loose ends. Once this phase ends, it's back to shuffling the deck conducting the Initiative Phase all over again. Rinse and repeat until five game turns have ended, and then declare the victor. During activation a model in any troop may perform up to two actions, and they can't ever perform the same action twice. Actions include...Focus, Specialty, Move, Charge, Run, and Combat Actions are Fight, Shoot and Spellcast. Also a single model can't perform two different Combat Actions either, like Fight then Shoot, or Spellcast and then Fight, and so on. However a Troop can be made up of multiple models, or a single model. In the case of a multiple model Troop which has a Leader in it, you could effectively bring a Spellcaster up and cast a spell, then move your ranged guys up to Shoot, and lastly Charge in with any melee guys to perform a Fight Combat Action. You could effectively pull off all three types of Combat Actions in a single Troop activation, with a Troop made up of multiple model types. As in most other games the models have to stay within so many inches of each other, but can move independent, they just have to perform any combat actions together at once. So if I move a bunch of guys up and perform a Shoot action, after that's been resolved none of the other models in the Troop can perform a Shoot action. However I can still move my Spellcasters up who didn't activate yet to cast spells, or melee guys who didn't activate yet to perform Fight Combat Actions. Most actions are self explanatory. Focus allows you to spend an action to focus on the task at hand, granting a +1 to any Attack Checks or Casting Check rolls. A Specialty action is used to activate certain Special Abilities (SA). There's also a few actions that are limited to Captain/Warlord/Leader class models like Rally, Inspire and Regroup. Combat is rather straight forward too. Line of Sight (LOS) is determined via a ½ inch wide corridor-like path drawn from the Attacker to the Defender. The size of the base of the Attacker and Defender comes into play here too, because if an object is within the corridor, and if that object is larger than the largest of the two models, then LOS if blocked. There's also no pre-measuring allowed, as all actions you wish to perform must be verbally made clear, before moving ahead to perform them. So if you declare a Shoot or Spellcast action, and then measure to find out you're out of range to the target, you still will have wasted that action for that model's activation. One thing that's different is the Charge in this game. In most games a Charge is usually a run, with a free single attack at the end. It doesn't work quite that way in Savage North. A Charge is your movement, plus 2-inches if needed to reach Base-2-Base (B2B) contact. If you want to attack after a Charge, you then spend the other action of your two allowed per turn to perform a Combat Action at that point. I guess it works out somewhat the same as it does in some other games, it's just a little different, because it's split up into two actions in Warlord. Also you cannot simply use a Move Action to get into B2B contact with an enemy, you must always declare a Charge to reach B2B contact. Combat resolution is quite simple too. Here's an example of ranged combat...The Attacker rolls a D10 and adds their RAV (Ranged Attack Value), and if the combined result is equal to or greater than the DV (Defense Value) of the Defender, then the attack is successful. Every successful attack deals one point of damage. Damage is tracked on the Data Card, and as you take damage your stats are changed to reflect being hurt via the Damage Track (DT). Essentially all of the stats that really matter are presented vertically in rows from top to bottom. Right next to them will be other columns to the right, which are the columns you use as you take on damage. So before taking damage you're MAV might be 3, and your DV might be 9, but take one point of damage and you're now forced to use the stats in the next column to the right, which says you're MAV is now 2, and your DV is now 8. The number of columns provided in the DT varies from model to model, as some only have a single row of stats, therefore when they take a single point of damage they're dead. Others have as many as six columns, which would represent a pretty strong model, and one with that many rows would usually be a Warlord status model. The easiest way to handle this is a dry-erase marker, and a plastic card protector sleeve, and simply cross out the rows you can no longer use as you take damage. One thing I found unique is that when conducting Ranged combat, the Defender is allowed to retaliate with Defensive Shots. To be eligible the Defender must have a RAV value, they can't be in B2B with anyone, and they have to be in range, but they do not require LOS to fire back. Which makes sense, after all if the attacker shot you common sense dictates that you too should have LOS back to them. Melee Fights are resolved pretty much the same was as ranged attacks (MAV+D10 vs the DV), and Melee even grants what is called Defensive Strikes too, which is almost the same as the Defensive Shots, as it also allows the Defender to strike back. Spellcasting is similar, only those who can cast spells will have X number of Spell Points (SP) to spend on casting spells for the entire game. There's Non-Attack Spells which are versus the static number of 10 as the threshold, and then there are Attack Spells which is resolved versus the Magic Defense value (MD) of the Defender. The SP value is presented in a X/X format, with the first number being the highest point value you can spend on any single spell, and the second value on the right of the slash is the maximum SP you have to spend for the entire game. Some spells remove negative effects, some grant bonuses, others are outright attacks, and so on. There's a pretty varied list of spells to choose from, but each caster is limited by what Tomes they have access to, and this is listed on their Data Card. Windwall, Chainlightning, Burning Touch, Iron Skin, Resurrection... all of those names should give you an idea of what kind of spells are available. Each Tome grants access to anywhere from as little as three, to as many as five different spells. Some casters have just access to a single Tome, where others can access multiple Tomes too. It varies. There's also about six pages worth of Special Abilities (SA) outlined, and most models have a few. Some are quite funny, because a model for example with the Short SA doesn't block LOS, or provide cover for any models other than other Short models, and they gain a +1 DV against models with larger bases in Melee. A model with Weaponmaster may re-roll a single attack roll once per activation, but it can't be used on Defensive Shots. Weaponmaster can also be a melee or ranged SA, and to tell which it is, it would be listed next to the RAV or MAV value on a Data Card. The Tactician SA is pretty helpful too, as it grants a bonus card to be included in the Draw Deck in the initiative phase. Lock Shields allows friendly models in B2B with each other to grant a +1 DV and + MD bonus to each model. Pierce is a rather helpful ranged SA, because if you succeed by 3 or more over what you needed to pass the Attack Check, then you do 1 extra point of damage to the Defender. Indirect Shot is another ranged SA, and it allows you to make a ranged attack without LOS to the target, but it will cost one Specialty Action to grant Indirect Shot, and then another Combat Action to Shoot. Savage North can be played with as little as a few models per side, or as high as 1,000+ point games. Each model has a Cost listed on the Data Card to use them in a game, so army building is simply a matter of agreeing on a point size for a game, and adding up your models. Reaper even has an online Army Creator to do most of the work for you. Savage North Versus Warlord 2nd Edition...
What separates Savage North from the Warlord 2nd Edition rulebook is that Savage North takes place in the fictional land of Northern Adon. The Savage North is a unforgiving and very cold place based on the descriptions provided. You also don't need the Warlord 2nd Edition rulebook to play Savage North, as Savage North is a completely self contained game of its own, but is based on the Warlord 2nd Edition/RAGE game engine. Savage North adds eight all new factions to the Warlord 2nd Edition game universe. Within the pages of Savage North you'll find all new armies for the Bloodstone Gnomes, Wood Elves of Tembrithil, Dark Elves of the Darkreaches, Dwarves of Kragmarr, Orcs of Kargir, Giants of Icingstead, Koborlas of the Nornwood and the Sisterhood of the Blade. Each of these new factions are detailed with a few pages of fluff, and then an overview of all the Data Cards provided, plus all of the perks and abilities granted to each of the armies. There's about 13 pages maximum provided covering each of the new factions. The book itself is printed mostly in black and white, on glossy premium paper. It's laid out quite logically, and learning the game based on how it's laid out shouldn't be to tough, because I didn't find that I had to jump around at all to figure anything out. Visually speaking, there's a lot of artwork throughout the book, and even the background of many of the pages throughout are decorated up nicely. It's clear they made a conscious effort to put together a nice book. It really sets the mood visually too, and it's advertised on back of the book that there's artwork from Wayne Reynolds, and all new stories featuring new characters from Savage North. However, while this is mostly a black and white effort pages 153-168 are presented in full color. This section begins by showcasing a page for each new faction, with photographs of an assortment of the Reaper's studio painted models for each one. It concludes with a really nice and extremely helpful painting guide, running the reader step by step through the painting process. Lastly page 168 has 3 templates in full color, which you can photo copy and use for playing Savage North. The Warlord Savage North Models Range
This section could literally take up thousands of words, because there's probably more models available in the entire Warlord range than there is in Games Workshop's Warhammer Fantasy Battles and 40k ranges combined. I could be wrong, but I counted 744 Warlord products being displayed on their website under the Warlord category. If it's not more, it's certainly pretty darn close. The scale of Warlord models is considered 25mm Heroic Scale, and I've taken photos of them next to many other 28mm scale fantasy models, and I think they look fine next to most other 28mm scale models. At a glance I'd have guessed they were 28mm scale to begin with, not 25mm. Savage North recycles some of the existing models, and introduces a variety of new ones into the Warlord range. For instance the Koborlas of Nornwood is made up of many of the existing Koborlas models from Warlord 2nd Edition, but it also brings some new models to the table as well. However there's a lot more models listed in the Savage North book, than there is models currently available. The same is true of many of the models listed by Data Card in the Savage North book. For instance there's 13 listings for Icingstead models at the Reaper website, but there's 23 different Data Cards listed in the book under the Icingstead faction. There's 15 Orcs of Kargir listed as models available at the Reaper site, but 26 Data Cards listed in the book. I was informed by Reaper that many of the missing models are simply yet to come. Being very familiar with Reaper's minis, I expected all high quality models sculpted by many of the industries best sculptors, with minimal flash, and parts that fit together rather well. I wasn't disappointed. I've been building a Koborlas of Nornwood army, and a Razig army for Warlord, so I've seen quite a few models from each faction now first-hand. Some of the models have been around for quite some time now too, as the Reaper online store lists the models by SKU and by date released, and many are from as far back as 2002-ish. Here's a rundown of model reviews, based on the models I've seen first-hand... Vasyl RageClaw Alpha This is a 2-piece model. For the most part it's a rather large single casting model, but the left arm with the Doomcrier horn in-hand from the shoulder down comes separate. Clean up didn't require much work, there's a few flash tabs along the bottom of the slot, and a few mold lines to flatten, but that aside nothing out of the ordinary. He also comes with a 40mm square slotted base. The model itself is rather impressive. He's not only quite large, but really detailed. This is also an older Werner Klocke sculpt, so I'm not surprised. By looking at it, you'd never know this was a sculpt released as far back as 2002, but it is. This is also ranked as a Warlord class model in the game, and is one of the models you'd definitely want in a Koborlas faction army for Warlord 2nd Edition or Savage North. This model sells for $14.99 USD. As large as he is that price point is quite reasonable. He's so big that his weapon was literally ripping out of the blister pack when he arrived too. In this day and age those older really thin square 40mm slotted bases, like the one he comes with, is starting to show their age. I just don't like them much, especially when it comes to using heavy all metal models on them. It would be nice if Reaper (or someone else even) came up with a 40mm square slotted base that didn't seem so thin and fragile. That's my only gripe on the topic of this model. Corm, Ghostmane Shaman This is another Werner Klocke sculpted model. Corm is another 2-piece model as well, as the backpack with bones and things on it is a separate piece. Clean up and assembly didn't present any challenges out of the ordinary, there's a mold line or two, but that's about it. The model itself is rather nice, as there are some detail and little bits to pick out on the backpack and armor/clothing that's there. Like Vasyl this too is quite a large model, and also comes with a 40mm square slotted base. Corm also shares the same price-point as Vasyl at $14.99 USD. At just 60 points Corm is also quite useful , with access to the Earth and Restore Tomes, and is also considered a Unique/Elite ranked piece. Feral Hunter Feral Hunter is sculpted by Tim Prow. This is a 4-piece model, not including the 40mm square slotted base that's provided. Both of the arms and tail come as separate pieces. Like most of the lupine beasts in this faction, this too is a rather large model. With that being the case, as you might expect the pieces are quite thick and heavy too. This is a model that you may want to consider pinning. As brave and bold as I usually am, I opted to try my luck with medium viscosity CA glue alone, and so far so good. I'm just very careful not to drop or bump this model, because I know since it isn't pinned, that I'd likely bust an arm or tail right off without a lot of effort. Thankfully all of the pieces do fit into place rather nicely, and quite snug, with only minor filling away at the mold lines and flash tabs. Preparing this beast wasn't tough at all. The only thing I don't like about models this big, is when the tab on the bottom is simply too thin to fit snug into the slotted bases provided. Normally when this occurs I bend the tab to zig-zag it a little, allowing it to press up against the inside of the slot on a base better. Which is exactly what I've had to do for the majority of these large pieces. It's a minor gripe really, because you need to do this with so many models so often that it becomes second nature, nonetheless it's still annoying. This fella isn't quite as large as the previous two models detailed above, and is priced appropriately at just $9.99 USD. Considering there are models out there at 1/3rd the size of this guy selling for the same price, with a lot less metal in them overall, $9.99 USD is almost a steal. Best of all, he looks a lot like a traditional werewolf, and could serve different roles in other games too. The only thing that gives away he's a fantasy-genre model is the wristbands. Feral Hunter is a Soldier class model, and is quite versatile based on the SA he posses, plus he comes in at 52 points to use in the game. Rageclaw Warrior Werner strikes again with this sculpt of the Rageclaw Warrior. This model comes in 2-pieces, as the arm with weapon comes separate. The pose is quite dramatic on this guy, as he's poised to leap and strike at an enemy. Clean up and assembly is once again quite simple. The fact that these have a lot of fur, helps to really hide, or obscure most mold lines, so getting rid of them over fur isn't usually too tough. However, these aren't mold line heavy by any means either. Once the arm is in place, he's ready for his base and some primer. It's that simple. He isn't quite as tall as the other models listed above, but he's about the same size as Feral Hunter, only he's crouched down, so his mass is positioned lower to the ground. This is pretty much one of the rank and file Soldier rank models for a Koborlas faction army, and at just 36 points he's pretty useful. In real world costs, he'll set you back just $9.99 USD just like his pal the Feral Hunter. Again there's a lot of metal in this fella, and he takes up a lot of that 40mm base, so you're getting your moneys worth with the Rageclaw Warrior without a doubt. Kosumi, Frostfang Huntress This model is sculpted by Patrick Keith, and this is also one of the larger models available in the Koborlas range. She's a 2-piece model, as the right hand and left arm is attached to the staff/polearm-like weapon she's carrying, which you have to glue in to place. Of all the models in this range, the female lupines really don't visually do much for me. There's nothing wrong with the model, I just think the male ones, like all of those listed above have a more fierce and feral look about them, and the female ones are lacking something in this range. The sculpt is nice, as there's a lot of crisp and pronounced detail to be found, I'm just not fond of it personally. Being one of the larger models she also carries a price-tag of $14.99 USD. In the game she's a Sergeant ranked model, and costs 61 points to play. So she's definitely useful in the game too. Incingstead Models... Some of the other models I've seen include the Incingstead faction Yeti Chieftain sculpted by Jason Wiebe and the massive Frost Wyrm scupted by Kevin Williams. The Yeti Chieftain is a 3-piece model, as both arms come separate. He's also about as large as the Feral Hunters. He's a Captain ranked piece, costing 69 points to take and is quite useful in the game overall. He's priced at $12.99 USD. The Frost Wyrm is a massive piece. There's over 20 pieces in this kit, and it comes in one of the largest reinforced blister packs that Reaper offers. I would only recommend this piece to very experienced modelers, because it requires some filling to get some of the pieces to fit together right. There's a lot of attaching little spiky bits too. Nonetheless, it is quite an impressive looking piece once finished and assembled. The Frost Wyrm stands a little under 4-inches tall once complete. The hardest part assembling this model is just figuring out where all the arms and spiky bits go on this thing. The picture at the website helps only so much. Additionally the two largest pieces come together via a very thick square peg, and a square hole in the base. I was required to file the peg down so that it would fit into the square hole, because there's really no way to get into the hole to bore it out enough so that the peg would fit. The price is the only downside of this piece, because it's really expensive at $39.99, especially when the Pathfinger Red Dragon sculpted by Julie Guthrie cost just $34.99, and it's much larger. Although I will say this... the Pathfinger Red Dragon is made up of less pieces, and I think the cost comes from the fact that more molds are required to cast all of the other bits needed. Overall the Frost Wyrm is a really nice looking piece, and in the game it's considered a Monster ranked model, and will set you back 153 points to play it, but it's definitely the kind of beast I'd want to have in an Icingstead army. The Dark Elves of Darkreach Models... The models from this faction that I've seen firsthand are pretty limited. This is one of the factions that most of the models just aren't available yet. There's about 9 models available at present, out of the 24 listed in the Savage North book. Avrix Dirthe, Dark Elf Champion is a 2-piece model, sculpted by Bobby Jackson. The level of intricate detail is impressive. I love the armor, and how the sword is oversized. She's a fantastic piece, best of all, she's priced at just $4.99 USD. In the game she's listed as an Elite ranked model, and she will set you back 91 points to play her, but she's quite useful to boot. Shadowstep Warrior is another Bobby Jackson sculpt from the Darkreach range. She's also a single piece casting model, so there's no assembly to speak of, simply remove the mold lines and any flash, and she's ready for her 25mm square slotted base. She's also another good looking model, and in the game she's a rank and file Soldier ranked model, so you'll want to pick up a few of her if you plan to put together a Darkreach army. This model is also priced at just $4.99 USD. Lastly here's another Bobby Jackson sculpted model. Erdolliel Saerwen, Dark Elf Glaive Thrower is another single piece casting. She's considered an Elite ranked model in the game, and she's quite sneaky vixen, as she also has Spy, Stealth and Raider SAs, and she's also one of only three Darkreach models listed in the book with the ability to attack at Range. At $3.99 USD she's also an amazing value. Almost all of the models, except two of the nine listed are priced at $4.99 or less for the Darkreach faction. They might very well be the Warlord faction to pursue if you're a budget minding gaming enthusiast. The Razig
While putting this review together, I was also able to see first-hand some models from the Razig faction, which is an existing Warlord 2nd Edition army. Since I enjoy the Pirate motif a lot, it didn't take me long to decide upon the Razig as my 2nd Warlord army to work with. This is essentially an army of skeleton pirates, and undead sea types. There's a lot options for this army too, as there's a total of 25 unique models available to choose from at Reaper's online store. Out of the ones I've seen first-hand Razig himself is quite impressive, and is sculpted by none other than Werner Klocke (who just so happens to own Freebooter Miniatures now, and is also responsible for the P irate skirmish game Freebooter's Fate). This is a sculpt from as far back as 2002, but it still looks great today, even up against some of his newer sculpts from the Freebooter's Fate line. Razig Razig is the Warlord model for the Razig faction, and as the name implies he's the head honcho on the seas of Adon just the same. There's only one piece to assemble, his arm to the body, and the body to the base. There's a small scenic-base detail included too, as he's standing on some wooden bits, which look like debris from a pirate ship, and a piece of a log that you tie off a ship on at a dock. It's also a rather clean model. Aside from a faint mold line he was ready for primer in no time. At $6.99 USD he's a steal for a great Werner Klocke sculpt. Clarissa Banshee Next up is Clarissa Banshee, she's the Spellcaster for my Razig force, and as the story goes she's also Razig's only true love, which now lays on the bottom of the ocean floor more often than not. She's a creepy ghostly dead chick, who evidently has drowned. She's sculpted by another popular sculptor Gene Van Horne, and is a single piece model. She's quite tall and I like that the water is modeled at her feet like it is. Best of all, Clarissa Banshee is just $4.99 USD. The rest of my crew is a mix of Bone Marines, Skeletal Chain Gangers and Razig Skeletal Harpooners. Bone Marines The Bone Marines are sculpted by Kevin Williams, and there's three different sculpts available. The floppy hats on these guys are what really turns me off most about them. That aside they're decent skeletal/undead types, and they're the ranged guys for the Razig, so it's a good idea to have some around. They come in single random blister packs for $4.99 USD each, or in a pack of 9 (3x sculpts of each model) for $39.99 USD if you're building a large army. Skelatal Chain Gangers The Skeletal Chain Gangers are also sculpted by Kevin Williams, and I like these fellas. They have a little more character than the Bone Marines. They're all chained around the ankles, and they're duel wielding chains in each hand too. Once again there's 3x different sculpts available. These also come as single blister packed models for $4.99 USD each, or in a Chain Gang pack of 9x models (3x of each sculpt) for $39.99 USD, which is like buying 8 and getting the 9th one free essentially. Skelatal Harpooners The Harpooners are also once again sculpted by Kevin Williams, and they also come in 3x unique sculpts. They guys have some big harpoons, and I like that they're all wearing pirate-like bandanas. These and the Chain Gangers definitely look the part. Like the others these are $4.99 in single blister packs, or $39.99 in a pack of 9x models too. None of the crew types gave me much of a problem to assemble, as the Chain Gangers are the only multiple part models of the three types listed above. They're not much work, all you have to do is glue each hand to the wrist sockets, and they're pretty much done. As for mold lines and flash, I didn't encounter anything out of the ordinary with any of the three crew types either. Other Razig Options... None of the three crew types listed above really jump out and scream awesomeness, but there are other models in the range that do. This was an army built for playability, and to introduce me to Warlord versus the Koborlas army. There's a ton of other models that I'll eventually be adding to my Razig crew like Scurvy Dog Undead Werewolf, which is probably the sweetest looking model in the entire Razig range, at least I think so. It's a Tim Prow sculpt, and it's a zombie-fied werewolf, with fur rotten and falling off and the skeletal structure showing through. He's rather large too, and at $8.99 USD he's definitely on my must-have list. Next up is Dark Maiden. This is such an amazing piece that Reaper also makes a larger scale version of it in resin, which is quite expensive, but no doubt worth it. The Warlord scale version is only $8.99 USD, it's sculpted by Chaz Elliott, and she's essentially a solo piece for the Razig crew. She's actually the maiden made completely of wood that's usually seen sculpted onto the nose of a pirate ship. How freakin' cool is that? The studio painted model is insanely sweet too. It's a model that can't be described properly in words alone. There's also a variety of other Sergeant and Captain types like Baron Lebone, Grim Pete and Blacknife, all of which are no more than $4.99 USD each. There's also a neat model called Crow's Nest Willy, who is a sniper, with a sniper rifle and all, plus Razig's Revenge: Salty Saber is a $3.99 USD Gene Van Horne sculpt of a pirate with a monster crab claw hand. There's a couple of other rank and file options too, overall I think the Razig faction is one of the most affordable army options for Warlord 2nd Edition, which can be also played in Savage North, as most of the models are no more than $5 USD each. The Razig are also not listed in Warlord 2nd Edition, or in Savage North, but all of their stats are available through the online Army Creator at Reaper's website. There's also a small document to download covering their Army perks. Overall I think the Razig is one of the coolest bunch of undead/skeletal pirate models you can get anywhere. They're also probably the most affordable option available at present of professionally sculpted undead/skeletal pirate models to boot. The only ones that can come close to competing with most of these sculpts is the Ron & Bones Undead/Skeleton Pirate models, but those all sell for $10-$15+ each USD. The Razig on the other hand, are simply a fraction of the cost of the Ron & Bones models. Conclusion
Warlord in general really isn't a complex game to pick up and run with. After a game or two most gaming enthusiasts should have the basics down. Even just 400 point versus 400 point games can be quite fun, and challenging even. The Savage North is also not only a great expansion for Warlord 2nd Edition, but the fact that it's a completely self contained skirmish-scale game system as well make it a nice starting point for someone interested in jumping into Warlord. On the cons side, I'm not fond of having to print anything up to play any game. While all the info for the Data Cards is provided in the book for all of the Savage North models, you'll either need to photo copy those pages, or use the Army Creator from Reaper's website, and then print off those pages the way they have it all formatted. I should also add that the online tool Reaper offers is quite nice, because it will even list the special abilities and spells available to your models, which is a nice touch. The problem is if I have 9x different Bone Marines in my Razig army, the online Army Creator only shows me one copy of that card. So I'd imagine I need to print off the output from the Army Creator 8x more times to get the extra cards needed to play with. It would be nice if they just included the Data Cards somehow with the models to begin with. Heck, even if the card-stock used for the blister packs were the Data Cards, and I had to cut them out, that's still better than me having to go to Staples to pay and print stuff off. I know there's someone reading this saying “but what about inexpensive inkjet printers?” Yes I know all about inkjet printers, but I have terrible luck with them lasting very long, and ink cartridges are usually $30 USD bare minimum for any of them. Either way it's an additional cost. Aside from having to print/photocopy the Data Cards issue, I can't think of any other negatives to report. Savage North is the tip of the iceberg (no pun intended lol) when it comes to Warlord too. There's actually more factions available to choose from in Warlord 2nd Edition than there is in Savage North. Both Warlord 2nd Edition and Savage North are completely compatible with each other, and for this article I've played a Razig faction army from Warlord 2nd Edition versus the Koborlas of Nornwood faction from Savage North without a problem. The models are also really nice, and being that they're Reaper models they're sculpted by many of the industries best sculptors, and they're also made right here in the USA. If you're one who likes to "Buy American", Reaper's foundry is right here in the good old US of A, down in Texas. The buy in is quite reasonable too, as you figure the rulebook is $35 and the models needed can vary, but there's a variety of fairly inexpensive options available. For instance some of the Dark Elves Darkreach models are priced quite reasonably at $5 or less per model, so are the Razig, but if you go with an army with larger models then the up front cost is a little more, since you're paying for all that heavy metal in a large chunk. However you also need less models on the table when dealing with an army of large models like say the Koborlas. Warlord Savage North is also easy enough to grasp that it can be a beer and pretzels style game when working with smaller numbers of models per side, but it's also tactical and compelling enough that there's a tournament setting for Warlord as well, where it's played very competitively. The rules for using proxy models is very lax too, because as long as it's ANY Reaper model they're cool with it. Technically if you wanted to run an entire army made up of Reaper's Sophie the Succubus as a proxy model, effectively you could. All in all I think Warlord: Savage North is a superb fantasy-genre skirmish game, which can be great fun, and it doesn't hurt that it's supported by an ever growing model range of amazing models, sculpted by many of the industries best sculptors. Almost every fantasy stereotype is represented in Warlord too, so there's a little something for every fantasy skirmish gaming enthusiast to be found in the Warlord model range. |
  Be sure to visit our sponsors!  Be sure to visit our sponsors! |
|
|
|
- Home
-
Reviews
- Interview - Matt Wagner/Eagle Dynamics
- Interview - Polychop Simulations
- Review - MonsterTech HOTAS Table Mounts
- Review - Rebel Galaxy Outlaw
- Review - EVGA 2080 Super Black Gaming 8GB Video Card
- Review - ASUS VG49VQ 49 Inch Super Ultra Wide Gaming Monitor
- In Focus Review - Heatblur's F-14 Tomcat Module for DCS World
- Classic Review - Jetfighter III
- Review - Thrustmaster T.Flight Rudder Pedals
- Review - Thrustmaster HOTAS WARTHOG Joystick
- First Impressions - DCS World High Fidelity Modules
- Classic Review - Suncom Strike Fighter Series Throttle
- Classic Review - F-22 Pro Joystick from Thrustmaster
- Classic Review - EuroFighter 2000
- In Focus Review - DCS World Persian Gulf Map Module
- Classic Review - US NAVY Fighters
- Review -TrackIR 5 from NaturalPoint
- Review - Thrustmaster T16000M FCS HOTAS
- Classic Review - Jane's AH-64D Longbow
- In Focus Review - DCS World Revisited: Diving off the Flaming Cliffs
- In Focus Review - State of Flight-Sims and HOTAS Games 2019
- Review - Flamberge/Jumping Atlas/WASP WSP-1 Models from Iron Wind Metals
- Review - Star Trek Starships Collection
- Review - Knight Models Arkham City Bane 35mm Model
- Review - Knight Models Man of Steel & Frank Miller Batman 35mm Models
- Review - Mecha Zone 2: The Art of David A White
- In Focus Review - SuperSystem 3rd Edition
- In Focus Review - Heavy Gear: Arena Two-Player Starter Set
- Review - JUNK: Dogface Combots from Grindhouse Games
- In Focus Review - ShadowSea from AntiMatter Games
- Review - TRO 3085 Lance Pack
- Review - Technical Read Out 3085 & Record Sheets 3085
- In Focus Review - JR Miniatures 25mm Medieval Structures
- In Focus Review - Dust Tactics
- In Focus Review - War Rocket
- In Focus Review/Interview - Plasma Blast Games 6mm Sci-Fi Models
- Review - PortableWarfare Sergeant Case
- Review - Steel Warriors
- Review - Having Good Hex: Hex Bases 101
- Review - Xmarx & Old Crow 6mm Sci-Fi Models
- Review - BattleTech Mech Models
- In Focus Review - BattleTech
- Review - Song Of Our Ancestors
- In Focus Review - BattleTech Total Warfare Core Rulebook
- Review -Rosemary & Co Brushes
- Review - Q-Workshop Pirate & Sniper Dice
- Review - HiTech Miniatures SF Commander & 25mm Resin Bases
- Review - Tengu Models
- Review - Atomic Super Humans
- In Focus Review - Warlord 2nd Edition/Savage North
- Review - The Complete Guide to Miniature Painting
- Review - JR Miniatures 15mm Scale Terrain
- Review - HellDorado LOST Starter Set Review
- Review - Heavy Gear: Black Talon Return to Cat's Eye
- Review - Mantic Games Dwarfs Iron Belcher Cannon Review
- Review - Heavy Infantry/Kolony Feral HQ Models
- Review - HellDorado Westerners Starter Set
- In Focus Review - Heavy Gear Interpolar War 2-Player Starter Set
- Review - Micro-Art Studio Hive/Power Plant and Ruins Bases
- Review - Wargames Factory Shock Troops Models
- Review - Mantic Games Dwarfs IronClad Regiment
- Review - Mantic Games Dwarfs Ironwatch Troop
- Review - MERCS Minis FCC Models
- In Focus Review - Incursion board game from Grindhouse Games
- Review - Incursion Models from Grindhouse Games
- Review - MERCS Minis USCR Models
- In Focus Review - AE Bounty from Darkson Designs
- Review - AE Bounty Starter Set Models
- Review - Micro-Art Studio Great Wolves
- Review - Kabuki Models Revisited
- In Focus Review - Eden Post Apocalyptic Skirmish Game
- Review - Soda Pop Miniatures Models
- In Focus Review - Warpaints Wargaming Starter Paints Set
- Review - Freebooter's Fate: Crew Expansion Models
- In Focus Review - Quantum Gothic Part III
- Review - Ron & Bones Undead/Skeleton Models
- Review - Zynvaded Starter Set
- In Focus Review/Interview - Reaper Miniatures, Inc
- Review - Armory Primer
- Review - Pulp City Models
- In Focus Review - Bob Smith Industries CA Adhesives
- In Focus Review - Derivan MiNiS Paints
- In Focus Review - MaxMini Models & Bitz
- In Focus Review - Studio Miniatures Models
- Review - Q-Workshop's Forest & Celtic Dice Sets
- In Focus Review - The Army Painter QuickShade
- In Focus Review - da Vinci paint brushes
- In Focus Review - Ramshackle Games Post Apocalyptic Models
- In Focus Review - Brotherhood of Assassins
- In Focus Review - Flames of War - Dogs and Devils Campaign Book
- In Focus Review - Flames of War: Open Fire Starter Set
- In Focus Review - Wardroids
- In Focus Review - Coat D' Arms Acrylic Paints
- In Focus Review - HeroScape Dungeons & Dragons Master Set 3 - Battle for Underdark
- In Focus Review - Dice of the Dead
- In Focus Review - Please Stand By
- In Focus Review - Fear And Faith
- In Focus Review - Filla-Glu
- First Look Preview - AE Bounty
- In Focus Review - The Army Painter Brushes
- In Focus Review - Crooked Dice Game Design Studio
- In Focus Review - Quantum Gothic Revisited
- Preview - Judge Dredd
- In Focus Review - Tannhauser Revised Edition
- In Focus Review - Freebooter's Fate
- Preview - Dust Tactics/City of Thieves
- In Focus Review - Mutants and Death Ray Guns
- In Focus Review - Song of Blades and Heroes
- PC Hardware Review - Saitek X-52 Pro HOTAS
- In Focus Review - Knight Models: Star Wars 30mm Models
- PC Review - Wings of Prey
- In Focus Review - Pig Iron Productions Kolony Feral Squad & Specialists
- In Focus Review - Q-Workshop Dice
- PC Review - Torchlight
- Review - The Adventurers
- In Focus Review - Mantic Games: Introduction to the Undead
- In Focus Review - Red Ops 5
- In Focus Review - All Things Zombie: Better Dead Than Zed
- In Focus - The Coolest Game You'll Probably Never Play!
- In Focus Review - Atlas Brush Company, Inc.
- In Focus Review - Ziterdes Models
- In Focus Review - Micro-Art Studios
- In Focus Review - Faction Wars
- PC Review - Warhammer 40k: Dawn of War II Chaos Rising
- In Focus Review - Pegasus Models
- Classic Review: Mage Knight 2.0
- Review In Focus: Quantum Gothic
- PC Review: Airstrike Eagles of World War II
- In Focus Review - Avatars of War & Arena DeathMatch
- Review In Focus: Windsor & Newton
- First Look Preview: Kabuki Models
- Classic Review: How to paint Citadel Miniatures
- Review: Pig Iron System Troopers/Kolony Militia
- Classic Review: In Focus ESLO Terrain
- In Focus Review: MERCS YellowJackets & KemVar
- Review: Toy Soldiers 101: Little Wars
- Review: Warmachine Plastic Heavy Warjack kits
- Editorial: State of the Game Warhammer 40k
- P3 Model Drilling & Pinning Set
- Review: Miniature Paints 101
- Review: Kabuki Models 21st Century Pinups & Dark Messiah
- Review: Cool Wargame tools
- Classic Review: Warmachine 2003
- Retribution of Scyrah Overview
- Classic Review: Lord of the Rings Return of the King Strategy Battle Game
- Classic Review: Dogs of War
- Review: Sabol Monthy Deals
- Want your product covered?
