|
June 28th, 2010
In Focus Review - Quantum Gothic Revisited  This time out we're here to take a look at another variety of resin scenery products from Quantum Gothic. Putting together a little fortification line is always fun, more so when you have some nice pieces to work with. I wanted to build something that could be useful, but look really good in a 25-28mm sci-fi skirmish game setting. The first company that came to mind was Quantum Gothic. Here's an in-depth look at a variety of pieces from Quantum Gothic, which when combined make for a rather nice fortification line. The first piece we'll look at is the Armored Bunker. The Armored Bunker is a 9-piece kit. Once assembled the bunker opens up so that you can place figures inside. The bunker itself is one rather large piece. To complete it you glue the back wall into place to make up the bottom half of the piece, then the small door/hatch to the outside rear of the bunker, and lastly attach the four spikes to the face. Once you assemble the two lid pieces into one, then it fits in place snug to top off the bunker completing the kit. The tiny little spikes were the only tough pieces to add, as I always tend to end up gluing tiny pieces to my fingers, before they end up sticking to what they're supposed to. They also include a really nice set of instructions to assemble the kit with, and I expected no less, since the previous Quantum Gothic kits included outstanding assembly instructions as well. This was so easy to assemble, that the instructions weren't really needed, but others will no doubt appreciate, and make use of them. Inside the bunker you can fit five or six 28mm scale figures, although some models with bits sticking upwards might be a tight squeeze, because vertical height is limited once the lid is set into place. The entire kit is made of high quality resin, and there was literally no mold lines, or flash to clean up at all as reviewed. After assembly, all I had to do was prep the the pieces for priming, prime them, and them slap some paint down on them. These aren't terribly difficult pieces to paint either. There's a lot of detail to be had, but not so much detail that it takes you forever to pick out and highlight every little bit. Sometimes less is more, and that's definitely the case with this model. 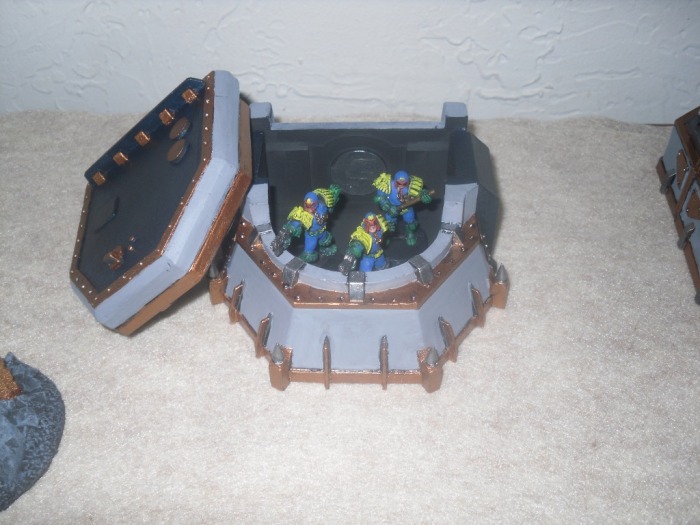   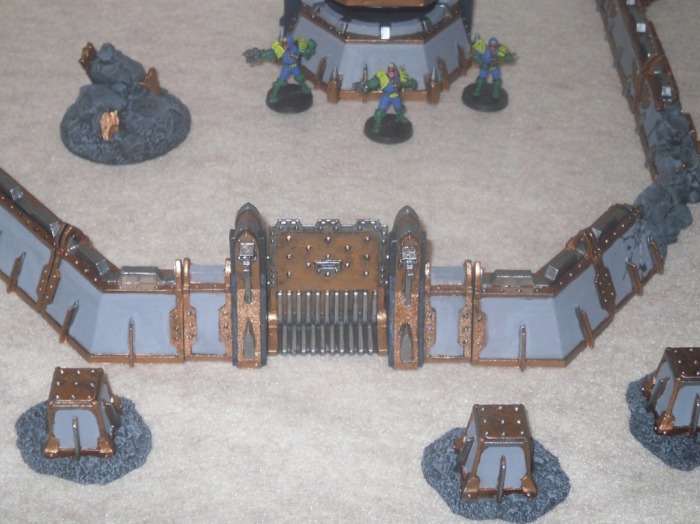 Next up is the Armored Walls set. Rob from Quantum Gothic was a little short on the wall pieces when he sent this set for review, so to clarify... the actual complete set comes with 3X straight pieces, 2X rubbled-up end pieces, 4X short corners, and 4X larger corners. I was a few corners, and 1x straight piece short in the kit as reviewed, so if there are a few pieces missing in the pictures, that's why.
Each of these pieces, were as expected rather clean, and this set requires no assembly at all. Every piece is cast in high quality resin, pretty much ready to go. The only thing I'd suggest is a quick dunk in some dish soap and hot water, to ensure there's no resin dust, or left over mold crud residue that can't be seen by the naked eye before priming. This is actually a step that's suggested for any resin kit, but when ever I end up with stuff this clean, I sometimes forgo that step. No set of walls would be complete without an Armored Gate. The Armored Gate kit is a 10-piece kit. The gate employs a drawbridge design, as it moves up and down, and features a moving part. It can be displayed open, or closed. This mechanism requires careful attention when gluing, because if you end up with glue in the wrong place when binding the hinges together, you can end up inhibiting the movement. Once I had everything set in place right, and the glue had dried, it worked like a charm. The gate mechanism is probably the only piece you need to pay close attention to when assembling it. There are also two side wall, or pillar-like pieces, which you can glue directly to the gate, but I kept mine separate, for easier storage. There are tabs underneath to bind it to the gate, and the tabs minus glue works well enough to keep it all together when I want to display the gate. Others will no doubt glue it all together. There are two smaller ornamental bits to glue onto the face, and two more that go on the back side of the pillar-like pieces. That's as complex as it gets. Once again, these were all very clean, almost ready to go pieces right out of the package just like the rest. To accent the arrangement we were also sent the single Rubble piece, which is a single cast piece of resin, depicting a rather large pile of rubble, with busted metal beams sticking out, and a set of the dragons' teeth, or Tank Trap/Stopper pieces as they call them. The Tank Traps are two pieces each, the trap and the base, and the set comes with five Tank Traps total. All of these pieces, including the rubble bases are single cast pieces, and no clean up or assembly is required. The traps can be displayed with, or without their bases, and the bases are scenic with little bits of rubble, which I thought was a nice touch. 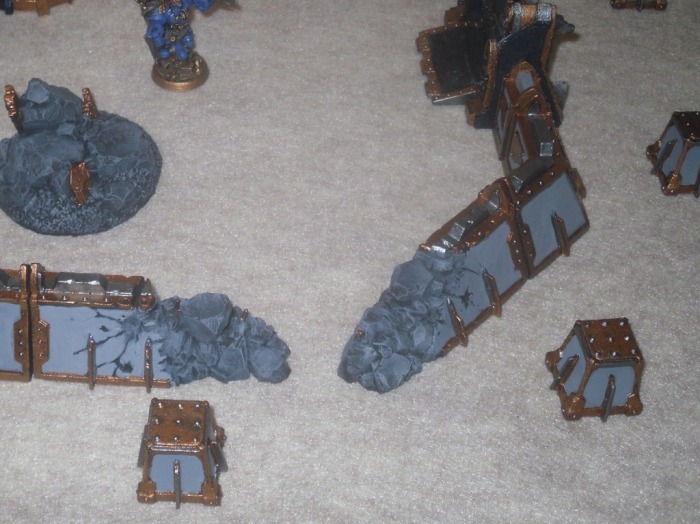 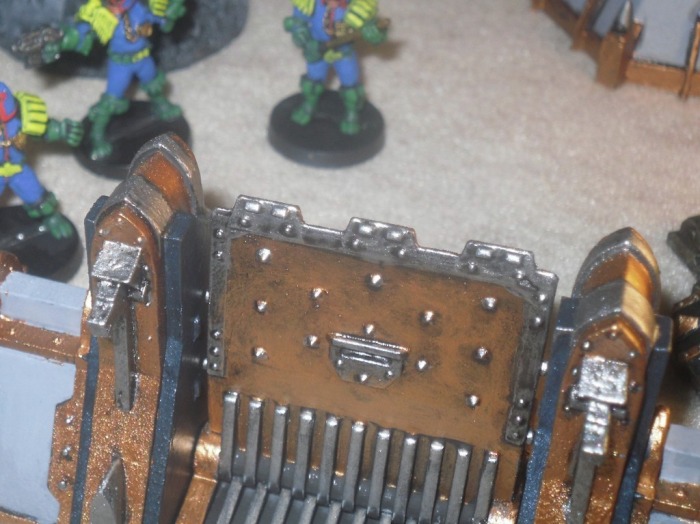 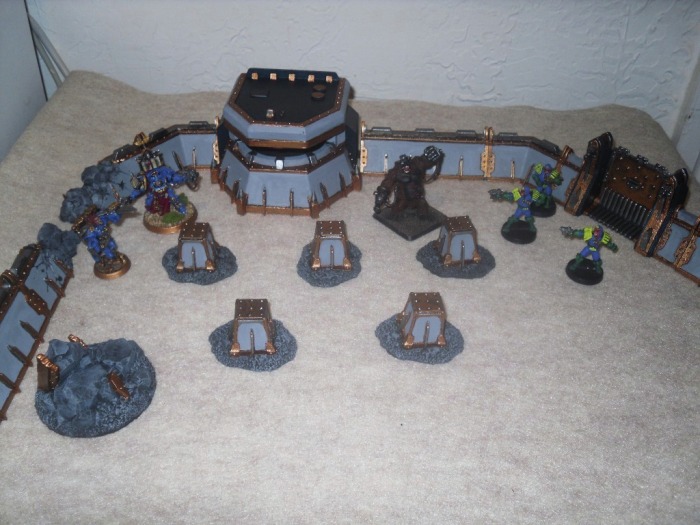 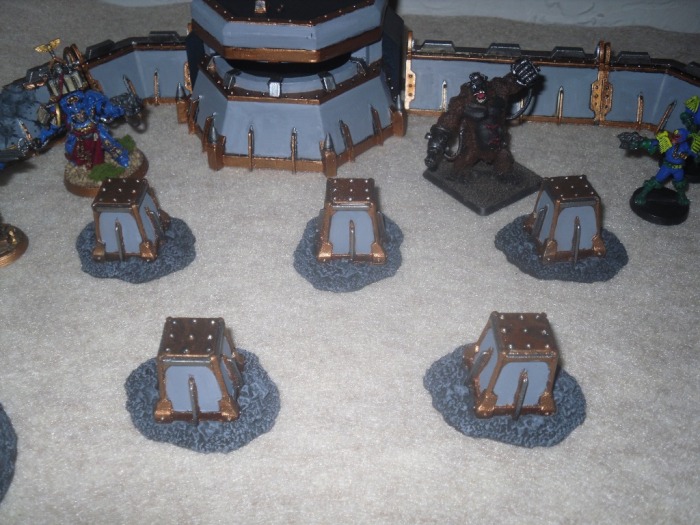 Conclusion
Once all setup and displayed, this is one amazing looking variety of sci-fi scenery pieces. By design these are fairly modular pieces, so you can mix and match, and move them around in various arrangements, which is what I think makes their products a little nicer than most. I only displayed them a few different ways, but the possibilities are endless with this stuff. To convey scale I utilized the new Mongoose Publishing Judge Dredd Street Judges in 28mm, the Ape is a Reaper Chronoscope piece, there's a Warmachine Scryah Heavy Warjack, and the Space Wolf LE and Terminator Librarian help to convey how well this stuff works with 40k pieces as well. All of which looked great with the Quantum Gothic pieces as the photos reveal. Quantum Gothic recently announced the release of sentry guns and a rather amazing looking cannon, both of which we should be taking a look at soon as well. To further add to the setup as displayed, you could also opt to include the Armored Watchtower, Communication Array and a Quantum Forcefield Pylons kit, and the previously reviewed Missile Launcher “Catalyst”, Communications Dish and Power Generator. I also included the three previous Quantum Gothic pieces which we reviewed before in one of the images to give you an idea of how nice all their stuff can look on display together all at once. There's no doubt about it, this is by far some of the best, if not these best sci-fi resin scenery/terrain pieces I've ever seen up close and personal. The only problem I encountered, is that there are two small tabs on each side of the bunker, these are to allow you to butt the walls up against the side of the bunker snug, to make it part of the wall-line. Once primed and painted, you just can't fit the wall pieces in between those tabs, without scraping the paint off the tabs, and the walls both in the process. You might want to file down the inner region of those tabs, before priming and painting, to counter the extra width that primer, paint and sealant will add. This is why I didn't have the walls snug up against the bunker in the photos. I didn't think of the filling down the tabs solution until after I had everything painted up. Price-wise I can't say that any of this stuff is cheap, but it's not cheaply made either. Quantum Gothic products are competitively priced with other quality resin kits available from ArmorCast, and other well known resin scenery/terrain companies out there. The big difference is, Quantum Gothic takes pride in the fact that they probably throw away pieces, which most other companies would sell any way. Almost every piece I've seen so far from them, was pretty much ready for primer right out of the package. I didn't have to cut flash away, deal with nasty mold lines, and do the usual prep work that's almost always associated with assembling models in this hobby, with any of these pieces. That's a level of quality you don't see offered very often in this industry these days. The Armored Bunker retails for 19.95 GBP, which equals $30 USD. The walls are offered a few different ways. You can buy the full set, which includes quite a few more pieces than what's displayed in this review for 32 GBP ($48 USD). Or you can purchase the different types of wall pieces in separate sets ranging from 7-10 GBP each set, with the straight walls only, corners only, damaged end pieces only, etc. The Gate will set you back just 12 GBP ($18 USD), Tank Traps 9.75 GBP ($14 USD) and the Rubble cost just 4 GBP ($6 USD). They also make an extension piece to make the gate double wide, which will set you back 4.5 GBP ($6.70 USD). All in all, adding it up all up sounds like a lot, but not too many people can afford to buy an entire table worth of terrain/scenery all at once, and you don't have to. Pick up a piece here, and a piece there, and you'll have a nice collection of impressive terrain for your gaming table before you know it. Best of all, none of this stuff is overly complicated to prepare and paint. There's a lot of detail, but not so much detail that it's like painting a miniature. While my paint jobs aren't going to win any awards anytime soon, I used just four colors (brass, boltgun metal, codex gray and gunmetal blue) essentially, and some minor washing, and I think it all turned out pretty nice. Someone with more skill and time on their hands I'd imagine could turn any of this stuff into something really special. |
 Be sure to visit our sponsors!  Be sure to visit our sponsors! |
|
|
|
- Home
-
Reviews
- Interview - Matt Wagner/Eagle Dynamics
- Interview - Polychop Simulations
- Review - MonsterTech HOTAS Table Mounts
- Review - Rebel Galaxy Outlaw
- Review - EVGA 2080 Super Black Gaming 8GB Video Card
- Review - ASUS VG49VQ 49 Inch Super Ultra Wide Gaming Monitor
- In Focus Review - Heatblur's F-14 Tomcat Module for DCS World
- Classic Review - Jetfighter III
- Review - Thrustmaster T.Flight Rudder Pedals
- Review - Thrustmaster HOTAS WARTHOG Joystick
- First Impressions - DCS World High Fidelity Modules
- Classic Review - Suncom Strike Fighter Series Throttle
- Classic Review - F-22 Pro Joystick from Thrustmaster
- Classic Review - EuroFighter 2000
- In Focus Review - DCS World Persian Gulf Map Module
- Classic Review - US NAVY Fighters
- Review -TrackIR 5 from NaturalPoint
- Review - Thrustmaster T16000M FCS HOTAS
- Classic Review - Jane's AH-64D Longbow
- In Focus Review - DCS World Revisited: Diving off the Flaming Cliffs
- In Focus Review - State of Flight-Sims and HOTAS Games 2019
- Review - Flamberge/Jumping Atlas/WASP WSP-1 Models from Iron Wind Metals
- Review - Star Trek Starships Collection
- Review - Knight Models Arkham City Bane 35mm Model
- Review - Knight Models Man of Steel & Frank Miller Batman 35mm Models
- Review - Mecha Zone 2: The Art of David A White
- In Focus Review - SuperSystem 3rd Edition
- In Focus Review - Heavy Gear: Arena Two-Player Starter Set
- Review - JUNK: Dogface Combots from Grindhouse Games
- In Focus Review - ShadowSea from AntiMatter Games
- Review - TRO 3085 Lance Pack
- Review - Technical Read Out 3085 & Record Sheets 3085
- In Focus Review - JR Miniatures 25mm Medieval Structures
- In Focus Review - Dust Tactics
- In Focus Review - War Rocket
- In Focus Review/Interview - Plasma Blast Games 6mm Sci-Fi Models
- Review - PortableWarfare Sergeant Case
- Review - Steel Warriors
- Review - Having Good Hex: Hex Bases 101
- Review - Xmarx & Old Crow 6mm Sci-Fi Models
- Review - BattleTech Mech Models
- In Focus Review - BattleTech
- Review - Song Of Our Ancestors
- In Focus Review - BattleTech Total Warfare Core Rulebook
- Review -Rosemary & Co Brushes
- Review - Q-Workshop Pirate & Sniper Dice
- Review - HiTech Miniatures SF Commander & 25mm Resin Bases
- Review - Tengu Models
- Review - Atomic Super Humans
- In Focus Review - Warlord 2nd Edition/Savage North
- Review - The Complete Guide to Miniature Painting
- Review - JR Miniatures 15mm Scale Terrain
- Review - HellDorado LOST Starter Set Review
- Review - Heavy Gear: Black Talon Return to Cat's Eye
- Review - Mantic Games Dwarfs Iron Belcher Cannon Review
- Review - Heavy Infantry/Kolony Feral HQ Models
- Review - HellDorado Westerners Starter Set
- In Focus Review - Heavy Gear Interpolar War 2-Player Starter Set
- Review - Micro-Art Studio Hive/Power Plant and Ruins Bases
- Review - Wargames Factory Shock Troops Models
- Review - Mantic Games Dwarfs IronClad Regiment
- Review - Mantic Games Dwarfs Ironwatch Troop
- Review - MERCS Minis FCC Models
- In Focus Review - Incursion board game from Grindhouse Games
- Review - Incursion Models from Grindhouse Games
- Review - MERCS Minis USCR Models
- In Focus Review - AE Bounty from Darkson Designs
- Review - AE Bounty Starter Set Models
- Review - Micro-Art Studio Great Wolves
- Review - Kabuki Models Revisited
- In Focus Review - Eden Post Apocalyptic Skirmish Game
- Review - Soda Pop Miniatures Models
- In Focus Review - Warpaints Wargaming Starter Paints Set
- Review - Freebooter's Fate: Crew Expansion Models
- In Focus Review - Quantum Gothic Part III
- Review - Ron & Bones Undead/Skeleton Models
- Review - Zynvaded Starter Set
- In Focus Review/Interview - Reaper Miniatures, Inc
- Review - Armory Primer
- Review - Pulp City Models
- In Focus Review - Bob Smith Industries CA Adhesives
- In Focus Review - Derivan MiNiS Paints
- In Focus Review - MaxMini Models & Bitz
- In Focus Review - Studio Miniatures Models
- Review - Q-Workshop's Forest & Celtic Dice Sets
- In Focus Review - The Army Painter QuickShade
- In Focus Review - da Vinci paint brushes
- In Focus Review - Ramshackle Games Post Apocalyptic Models
- In Focus Review - Brotherhood of Assassins
- In Focus Review - Flames of War - Dogs and Devils Campaign Book
- In Focus Review - Flames of War: Open Fire Starter Set
- In Focus Review - Wardroids
- In Focus Review - Coat D' Arms Acrylic Paints
- In Focus Review - HeroScape Dungeons & Dragons Master Set 3 - Battle for Underdark
- In Focus Review - Dice of the Dead
- In Focus Review - Please Stand By
- In Focus Review - Fear And Faith
- In Focus Review - Filla-Glu
- First Look Preview - AE Bounty
- In Focus Review - The Army Painter Brushes
- In Focus Review - Crooked Dice Game Design Studio
- In Focus Review - Quantum Gothic Revisited
- Preview - Judge Dredd
- In Focus Review - Tannhauser Revised Edition
- In Focus Review - Freebooter's Fate
- Preview - Dust Tactics/City of Thieves
- In Focus Review - Mutants and Death Ray Guns
- In Focus Review - Song of Blades and Heroes
- PC Hardware Review - Saitek X-52 Pro HOTAS
- In Focus Review - Knight Models: Star Wars 30mm Models
- PC Review - Wings of Prey
- In Focus Review - Pig Iron Productions Kolony Feral Squad & Specialists
- In Focus Review - Q-Workshop Dice
- PC Review - Torchlight
- Review - The Adventurers
- In Focus Review - Mantic Games: Introduction to the Undead
- In Focus Review - Red Ops 5
- In Focus Review - All Things Zombie: Better Dead Than Zed
- In Focus - The Coolest Game You'll Probably Never Play!
- In Focus Review - Atlas Brush Company, Inc.
- In Focus Review - Ziterdes Models
- In Focus Review - Micro-Art Studios
- In Focus Review - Faction Wars
- PC Review - Warhammer 40k: Dawn of War II Chaos Rising
- In Focus Review - Pegasus Models
- Classic Review: Mage Knight 2.0
- Review In Focus: Quantum Gothic
- PC Review: Airstrike Eagles of World War II
- In Focus Review - Avatars of War & Arena DeathMatch
- Review In Focus: Windsor & Newton
- First Look Preview: Kabuki Models
- Classic Review: How to paint Citadel Miniatures
- Review: Pig Iron System Troopers/Kolony Militia
- Classic Review: In Focus ESLO Terrain
- In Focus Review: MERCS YellowJackets & KemVar
- Review: Toy Soldiers 101: Little Wars
- Review: Warmachine Plastic Heavy Warjack kits
- Editorial: State of the Game Warhammer 40k
- P3 Model Drilling & Pinning Set
- Review: Miniature Paints 101
- Review: Kabuki Models 21st Century Pinups & Dark Messiah
- Review: Cool Wargame tools
- Classic Review: Warmachine 2003
- Retribution of Scyrah Overview
- Classic Review: Lord of the Rings Return of the King Strategy Battle Game
- Classic Review: Dogs of War
- Review: Sabol Monthy Deals
- Want your product covered?
